
There are many reasons that attack 1 won't work. One reason could be that you're not close enough to the AP. Moving your network card or laptop a couple of inches in different directions may help. It's amazing what a little turn can do.
There is another thing that can cause it to fail. MAC filtering may be turned on on the AP. What this means is that the AP only let's associations with MAC addresses that are on a list it has. So, what can we do. Well, we can turn on attack 3 and hope someone else is reconnecting to the AP at the current time. Not so hopeful?
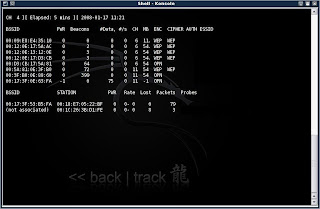
Okay, here's what we can do. You should still have airodump open from before. If not go back and follow the instructions to get it up and running. Now you will notice that besides the chart on top with the APs in range, there is also another chart under it. What's that?
Okay, that chart shows all other wireless network devices in range and the APs that they are associated with. Now, look at the list (if there is one). You may only have one or two computers in range, or maybe even zero. If you have none, sorry, you can skip this step. It's not going to happen. Actually, wait a few minutes and some connections may pop up.
If you've got a list of stuff there... Continue reading...
What we need is a computer that's associated with the target AP. The first column on the list will either say (not associated) or it will have a MAC address in it. This MAC address will match one of the addresses in the top chart. If it says 'not associated' then it is not going to suit our purpose. If you found an associated client with the first column matching our target AP, we're in luck.
What we now need to do is make our MAC address match the one that is associated. Why is this? Because although MAC filtering is on, if that MAC address is associated, it obviously is on the list of allowed MACs. So if our MAC matches that client's, then we're also allowed. COOL!!
To change our MAC address, open a Konsole shell.
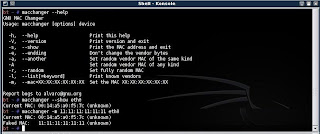
Type : macchanger --show rausb0
As usual, replace rausb0 with the name of your network interface device (eth0, ath0, ath1...). Now your screen should show you your current MAC address.
Type : macchanger -m 01:23:45:67:89:10 rausb0
Wait!! Don't type yet. replace the address 01:23:45:67:89:10 with the address of the associated client you found down on the bottom chart. (Not the AP we wat to connect to. The client that is connected to our target AP).
Now, when you again
Type : macchanger --show rausb0
your should see the associated client's MAC address as your own. Nice...
Now go back and try attack 1, and if the problem was MAC filtering, you've just solved it.
There is another thing that can cause it to fail. MAC filtering may be turned on on the AP. What this means is that the AP only let's associations with MAC addresses that are on a list it has. So, what can we do. Well, we can turn on attack 3 and hope someone else is reconnecting to the AP at the current time. Not so hopeful?

Okay, here's what we can do. You should still have airodump open from before. If not go back and follow the instructions to get it up and running. Now you will notice that besides the chart on top with the APs in range, there is also another chart under it. What's that?
Okay, that chart shows all other wireless network devices in range and the APs that they are associated with. Now, look at the list (if there is one). You may only have one or two computers in range, or maybe even zero. If you have none, sorry, you can skip this step. It's not going to happen. Actually, wait a few minutes and some connections may pop up.
If you've got a list of stuff there... Continue reading...
What we need is a computer that's associated with the target AP. The first column on the list will either say (not associated) or it will have a MAC address in it. This MAC address will match one of the addresses in the top chart. If it says 'not associated' then it is not going to suit our purpose. If you found an associated client with the first column matching our target AP, we're in luck.
What we now need to do is make our MAC address match the one that is associated. Why is this? Because although MAC filtering is on, if that MAC address is associated, it obviously is on the list of allowed MACs. So if our MAC matches that client's, then we're also allowed. COOL!!
To change our MAC address, open a Konsole shell.
Type : macchanger --show rausb0
As usual, replace rausb0 with the name of your network interface device (eth0, ath0, ath1...). Now your screen should show you your current MAC address.
Type : macchanger -m 01:23:45:67:89:10 rausb0
Wait!! Don't type yet. replace the address 01:23:45:67:89:10 with the address of the associated client you found down on the bottom chart. (Not the AP we wat to connect to. The client that is connected to our target AP).
Now, when you again
Type : macchanger --show rausb0
your should see the associated client's MAC address as your own. Nice...

Now go back and try attack 1, and if the problem was MAC filtering, you've just solved it.
2 comments:
excelent explanation of how to get around mac address filtering. the other tutorials ive read were complicated with a bunch of confusing jargon. this is simple and right to the point! thanks!
Man, You are the best! Easy to read, easy to understand! Thanks!
Post a Comment