Now that we got our network card into monitor mode, we're ready to roll. The first program we'll be using is airodump, or airodump-ng. We will run all our programs using Konsole Shells, which are opened by clicking on the second icon in the bottom left corner.
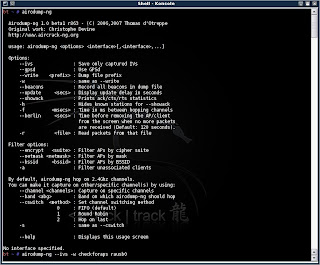
As with most any program in BackTrack, to see a short help file with all the possible parameters, just type the name of the program at the prompt in Konsole, so type : airodump-ng as seen in the following snapshot:

Yeah, I know. What is going on there, all those letters. How will I ever learn this. Good news!! We're only going to use at the most 4-5 parameters, depending on the situation.
The first thing we want to do is start airodump to discover the networks around us, and choose the target network we want to hack into.
Now that we're holding here I want to repeat what I wrote in the first post. I, by no means, condone hacking into someone else computer, or even wireless network. It may even be illegal in your country (i.e. England) to latch onto someone else's wireless internet connection. Also, as far as ethics is concerned, I believe it to be unethical to make use of someone else's connection. To hack into their computer and access their files is definitely illegal (I think) and is totally unethical.
Why then do I write this blog, you ask again. Firstly, hacking is a science like any other, that is learned for the knowledge as a end of it's own. Secondly, if you see how easy it is to hack into a system, you may do a little more to protect yourself. If you are reading this in order to do harm to others, please leave the site, and don't read on. Otherwise, we live to learn, to learn to live. Enjoy.
Back to airodump. We'll start airodump and look for our target.
Type: airodump-ng --ivs -w findtheaps rausb0
I will explain the above line. But first I must note that the word rausb0 is the name of my network card. I am using my WUSB54G card. Like I said earlier, my built-in Broadcom card is buggy when injecting. What I'm trying to say is, that your should put eth0 or ath0 or whatever your card is called instead of rausb0.
Okay, what did we just type. well...
airodump-ng is the name of the program that we're using.
--ivs means that we only want to save the data type that are called IVs. That stands for Initialization Vectors, which is the type of data we need to crack the WEP key. For now, and for a long time, we don't really have to understand it, but that's the fact. All one-letter parameters are preceded wtih one - (dash) and when we describe a parameter in length we use two dashes, hence the --ivs. If we leave out this parameter it will still work just as well, but it is capturing and saving more data with no use. For now, use it.
-w findtheaps means that we are telling the program to save, or write, the data captured to a file name findtheaps. You can name it anything, i.e. oldmcdonaldhadafarmeieio, but I prefer to call it something that will tell me what the file is (find the APs). For extra clarity, you may prefer to use two dashes and type --write findtheaps, which does the same thing.
rausb0 Finally, we end the line with the network interface we are using, which in my case, is rausb0.
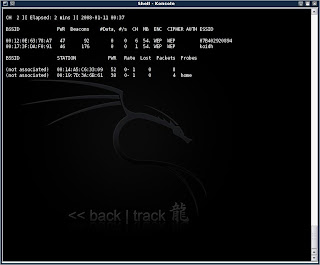
When you press Enter, you will something like this:

Huh?!? What's this stuff.
The first line says which channel you are currently scanning. It should be jumping around, since we haven't set a specific channel yet. Then it says time elapsed, blah blah blah.
Okay, now let's go to the chart, if you can call it that. Assuming you have a least one AP in the vicinity, it will show the info about it in cloumns. The first column is the BSSID, which is usually the MAC address of the AP. We will be using that in the future. The second column is the power, or strength, of the connection. In order to 'inject' you will usually need a decent connection. I find I need at least a power indicator of 40 to be able to inject. You will soon see what injection is.
The next column is Beacons, which is the signal that an AP sends out many times a minute/second to let everyone know that 'I'm here, come connect'.
The next column is the amount of data collected. This is the number we want to raise to at least 10000, or up to 2 million. Skip the #/s column. The CH column is the channel the AP is broadcasting on. We will need this information soon. The ENC and CIPHER column is the encryption methods used. We will, for now, only work with APs that have a WEP cipher. Skip the AUTH column. The ESSID column is the 'name' of the connection, which we will also be using. We won't be concentrating on the bottom chart just yet.
To be continued....

2 comments:
Where did you get 'rausb0' from?
How would I find that?
he explains it in the read. read slowly and carefully. not hard to understand. the 'rausb0' is his wireless card name that he is using.
Post a Comment